DIY NAS
Apart from having a local collection, the main advantage of an automated servarr (sonarr/radarr) setup is the possiblilty of auto-populating a list of titles based on a certain criteria. For example: all 'Marvel' films. In this article we will see how to build such a setup.
I think running a DIY NAS is a great hobby. This is an excellent exercise in selfhosting linux servers with the aim of maintaining them. And servarr for that matter is reasonably complex to integrate; you'll get a good feel of building docker services that will open the door to many other selfhosted services!
Considerations for our setup#
Arm SBC vs x86 powered machine#
This is the primary decision in our DIY NAS build. While SBC's are more power efficient and compact, I prefer go with a second hand ex-lease SFF(small form-factor) machine. While this is usually cheaper; you also get a sturdy casing to house your hard drives. They can take a max of 2 storage HDDs. If you want to hold more you can explore other options such as tower PCs. Take a look at NAS Killer builds over at serverbuilds.net.
The used SFF machines come in great discounts on ebay seasonally (as low as $50), get one with 8G of memory and atleast a 4th-gen core-i5 processor. You wouldn't need a powerful machine for you NAS. But if you're streaming your media outside of your local network, plex/emby will have to do transcoding which will take up CPU resource.
You have lots of choices here too... Dell Optiplex 3020 to HP Elitedesk G1/G2 and so on.
I personally use the first one... (Note that the above are affiliate links to ebay, where I get a small commission if you purchase through them)
OS#
Off the shelf (eg. freeNAS) vs plain Debian. Going with freeNAS we get the advantage of preconfigured easy RAID setup, but for our simple setup we won't use any RAID. Maybe just one or two HDDs (as our case supports) joined with the Logical Volume Manager (LVM) filesystem. The advantage of going with plain Debian in my opnion (other than flexibility) is that you don't have to put up with pesky UIs for tasks that can be easily achieved via the terminal. Be warned though, since we are managing a headless Linux system remotely this will be a lot of terminal commands through SSH session.
Setting up Services#
In my setup I have a 2.5" HDD for the boot Debian drive, and a separate 3.5" 4TB HDD for data storage, which like mentioned above expandable with LVM. This drive will be mounted to /mnt/main (I named the drive as main in the LVM). You will see reference to this drive path below when we configure our services.
Makesure you set an identifiable hostname to your Debian install, and to access it via this name you will have to install avahi-daemon:
At this point you can detach from keyboard and access you machine remotely... Using SSH:
ssh <user>@<your_hostname>.
Next install docker and docker-compose. Using the guides here and here respectively. There's instructions on those guides to setup the relevant repositories for Debian.
DockStarter#
If you are new to Docker services, a great place to start is the aptly named DockStarter. It is an application with settings preconfigured and the Docker commands have been made under-the-hood. You just make selections through the menulist wizard to enable/disable services. And it comes with a vast majority of services too. See here. It does cover most use cases of a Sonarr/Radarr setup!
In my opnion, DockStarter is great to understanding the mechanics of how Docker works without first getting bogged down with configuration details. Once you have understood this concept I encourage you to move on.
Do keep in mind DockStarter is a well polished piece of software, which is still handy for simple one-container deployments... In our case we have a whole host of containers interacting with each other, which is difficult to deploy even with DockStarter.
See here if you want to setup Servarr using DockStarter. This site has good information for all kinds of Servarr installs, so you could always refer here no matter which route you take!
Here we will be looking at plain docker-compose method of setting up services. The first course of action is to prepare our data drive.
Preparing the drive#
First we need to identify the disk ID. Run sudo fdisk -l | grep -i /dev/sd; in my instance for example:
Disk /dev/sdc: 3.64 TiB, 4000787030016 bytes, 7814037168 sectors <=== my 4T drive!
/dev/sdc1   2048 7814037134 7814035087  3.6T Linux filesystem
Disk /dev/sdb: 1.82 TiB, 2000398934016 bytes, 3907029168 sectors
/dev/sdb1   2048 3907029134 3907027087  1.8T Linux filesystem
Disk /dev/sda: 149.05 GiB, 160041885696 bytes, 312581808 sectors
/dev/sda1       2048   1050623   1048576   512M EFI System
/dev/sda2    1050624 310579199 309528576 147.6G Linux filesystem
/dev/sda3  310579200 312580095   2000896   977M Linux swap
We can see above that dev/sdc is our drive! Continue to follow instructions on formatting the drive here.
Finally add this line to /etc/fstab to enable automount:
/dev/vgmain/lvmain /mnt/main ext4 defaults,user 0 1
Note that you will need to create the main directory in /mnt. And note that I named my volume group, vgmain and the logical volume lvmain.
Once we have formatted the drive and have made provisions to auto-mount it; the last step is to create the directory structre that will hold our data.
media
├── torrents
│  ├── movies
│  ├── music
│  └── tv
├── usenet
│  ├── movies
│  ├── music
│  └── tv
└── medialibrary
   ├── movies
   ├── music
   └── tv
Run the following commands to create the above structure:
Download source#
Before we proceed, we have one more decision to make, regarding our download method to acquire content. There are three options:
- Torrent
- Usenet
- Debrid
We wont use torrents. Despite it being free, it's a network hog.
Debrid is a service that consolidates numerous hosting services under a single service. Thereby you can download in premium from all supported hoster just by logging into Real-Debrid. They now also have the option of direct downloading a cached torrent source. This is what makes it possible to use it in the servarr setup. To use it you need to enable the services jackett and rdt-client below in the 'downloaders' section.
Here we will use usenet as our download source. More instructions on setting up usenet is presented in [this article]({% post_url /bl/2022-02-23-basic-gpio %}). To use this we have enabled nzbget as our downloader below.
docker-compose config#
Make a new directory called servarr in your home directory to house the docker-compose config. This file will gather the configurations of all the services into one file. Once you have made this file you just have to execute sudo docker compose up -d within this directory in your bash shell. And after a few minutes the services will be accessible from their specified ports from the server's IP address. Here's my docker-compose.yml placed inside of that directory:
version: "2.1"
services:
  organizr:
    image: linuxserver/organizr
    container_name: organizr
    environment:
      - PUID=1000
      - PGID=1000
      - TZ=Europe/London
    volumes:
      - /mnt/main/config/Organizr:/config
    ports:
      - 80:80
    restart: unless-stopped

  filebrowser:
    image: hurlenko/filebrowser
    environment:
      - PUID=1000
      - PGID=1000
      - TZ=Europe/London
    ports:
      - 443:8080
    volumes:
      - /mnt/main:/data
      - /mnt/main/config/fb:/config
    restart: always

  syncthing:
    image: syncthing/syncthing
    container_name: syncthing
    hostname: mediasrv
    environment:
      - PUID=1000
      - PGID=1000
    volumes:
      - /mnt/main/media:/var/syncthing
    ports:
      - 8384:8384
      - 22000:22000/tcp
      - 22000:22000/udp
    restart: unless-stopped


  radarr:
    container_name: radarr
    image: ghcr.io/hotio/radarr:latest
    restart: unless-stopped
    logging:
      driver: json-file
    ports:
      - 7878:7878
    environment:
      - PUID=1000
      - PGID=1000
      - TZ=Europe/London
    volumes:
      - /etc/localtime:/etc/localtime:ro
      - /mnt/main/config/radarr:/config
      - /mnt/main/media:/data
  sonarr:
    container_name: sonarr
    image: ghcr.io/hotio/sonarr:latest
    restart: unless-stopped
    logging:
      driver: json-file
    ports:
      - 8989:8989
    environment:
      - PUID=1000
      - PGID=1000
      - TZ=Europe/London
    volumes:
      - /etc/localtime:/etc/localtime:ro
      - /mnt/main/config/sonarr:/config
      - /mnt/main/media:/data

  lidarr:
    image: lscr.io/linuxserver/lidarr
    container_name: lidarr
    environment:
      - PUID=1000
      - PGID=1000
      - TZ=Europe/London
    volumes:
      - /mnt/main/config/lidarr:/config
      - /mnt/main/media:/data
    ports:
      - 8686:8686
    restart: unless-stopped

# downloaders  =========================================================================


#  jackett:
#    image: ghcr.io/linuxserver/jackett
#    container_name: jackett
#    environment:
#      - PUID=1000
#      - PGID=1000
#      - TZ=Europe/London
#      - AUTO_UPDATE=true #optional
#      #- RUN_OPTS=<run options here> #optional
#    volumes:
#      - /mnt/main/config/jackett:/config
#      - /dev/null:/downloads
#    ports:
#      - 9117:9117
#    restart: unless-stopped
#
#  rdtclient:
#    container_name: rdtclient
#    environment:
#      - PUID=1000
#      - PGID=1000
#      - TZ=Europe/London
#    volumes:
#        - '/mnt/main/media/torrents/downloads:/data/downloads'
#        - '/mnt/main/config/rdt-client/:/data/db'
#    image: rogerfar/rdtclient
#    restart: always
#    logging:
#        driver: json-file
#        options:
#            max-size: 10m
#    ports:
#        - '6500:6500'
      #
      #  bittorrent:
      #    image: ghcr.io/linuxserver/qbittorrent
      #    container_name: qbittorrent
      #    environment:
      #      - PUID=1000
      #      - PGID=1000
      #      - TZ=Europe/London
      #      - WEBUI_PORT=8080
      #    volumes:
      #      - /mnt/main/config/qbittorrent:/config
      #      - /mnt/main/media/torrents:/data/torrents:rw
      #    ports:
      #      - 6881:6881
      #      - 6881:6881/udp
      #      - 8080:8080
      #    restart: unless-stopped
      #
  nzbget:
    container_name: nzbget
    image: ghcr.io/linuxserver/nzbget
    restart: unless-stopped
    logging:
      driver: json-file
    ports:
      - 6789:6789
    environment:
      - PUID=1000
      - PGID=1000
      - TZ=Europe/London
    volumes:
      - /etc/localtime:/etc/localtime:ro
      - /mnt/main/config/nzbget:/config
      - /mnt/main/media/usenet:/data/usenet:rw


networks:
  default:
    external:
      name: mynet
Note the ports. You need them to access the individual services. For example to access Radarr point to http://<your_server>:7878. On the default port (80) we have configured Organizr. Which is a bookmarker to other services to easily access them. Read more about this here. Note that in the config above, I have added filebrowser and syncthing services in case they become handy.
Configuring Downloader#
See above in Download source for more information on this.
Configuring Radarr#
See the separate post [Configuring Radarr]({% post_url /bl/2022-02-23-basic-gpio %}) on how to do this. Trash Guides is very handy. Here's a post on setting up Radarr quality profiles, so that you pull those juicy, efficient, balanced x265 encodes.
Repeat the same steps with Sonarr as well to configure it.
Media Streamer#
The one thing missing in the above config is the media streamer app. This is the service that let's you directly play content from your browser! Due to it's independant nature from the other apps I decided to keep this in a separate file. So we can easily bring up or down our servarr services together independent of the streaming service.
You can choose from three vendors:
- Plex
- Emby
- Jellyfin
We will choose Emby. So in your home folder again create a new directory and name it emby. Inside it put the following file docker-compose.yml:
version: "3.2"
services:
  emby:
      image: emby/embyserver
      container_name: emby1
      network_mode: host # Enable DLNA and Wake-on-Lan
      environment:
        - UID=1000
        - GID=1000
        - TZ=Europe/London
          #- UMASK_SET=022 #optional
      volumes:
        - /mnt/main/config/Emby:/config
        - /mnt/main/media/medialibrary/tv:/data/tvshows
        - /mnt/main/media/medialibrary/movies:/data/movies
        - /mnt/main/media/medialibrary/music:/data/music
      ports:
        - 8096:8096
          #- 8920:8920 #optional for secure connections
      restart: unless-stopped
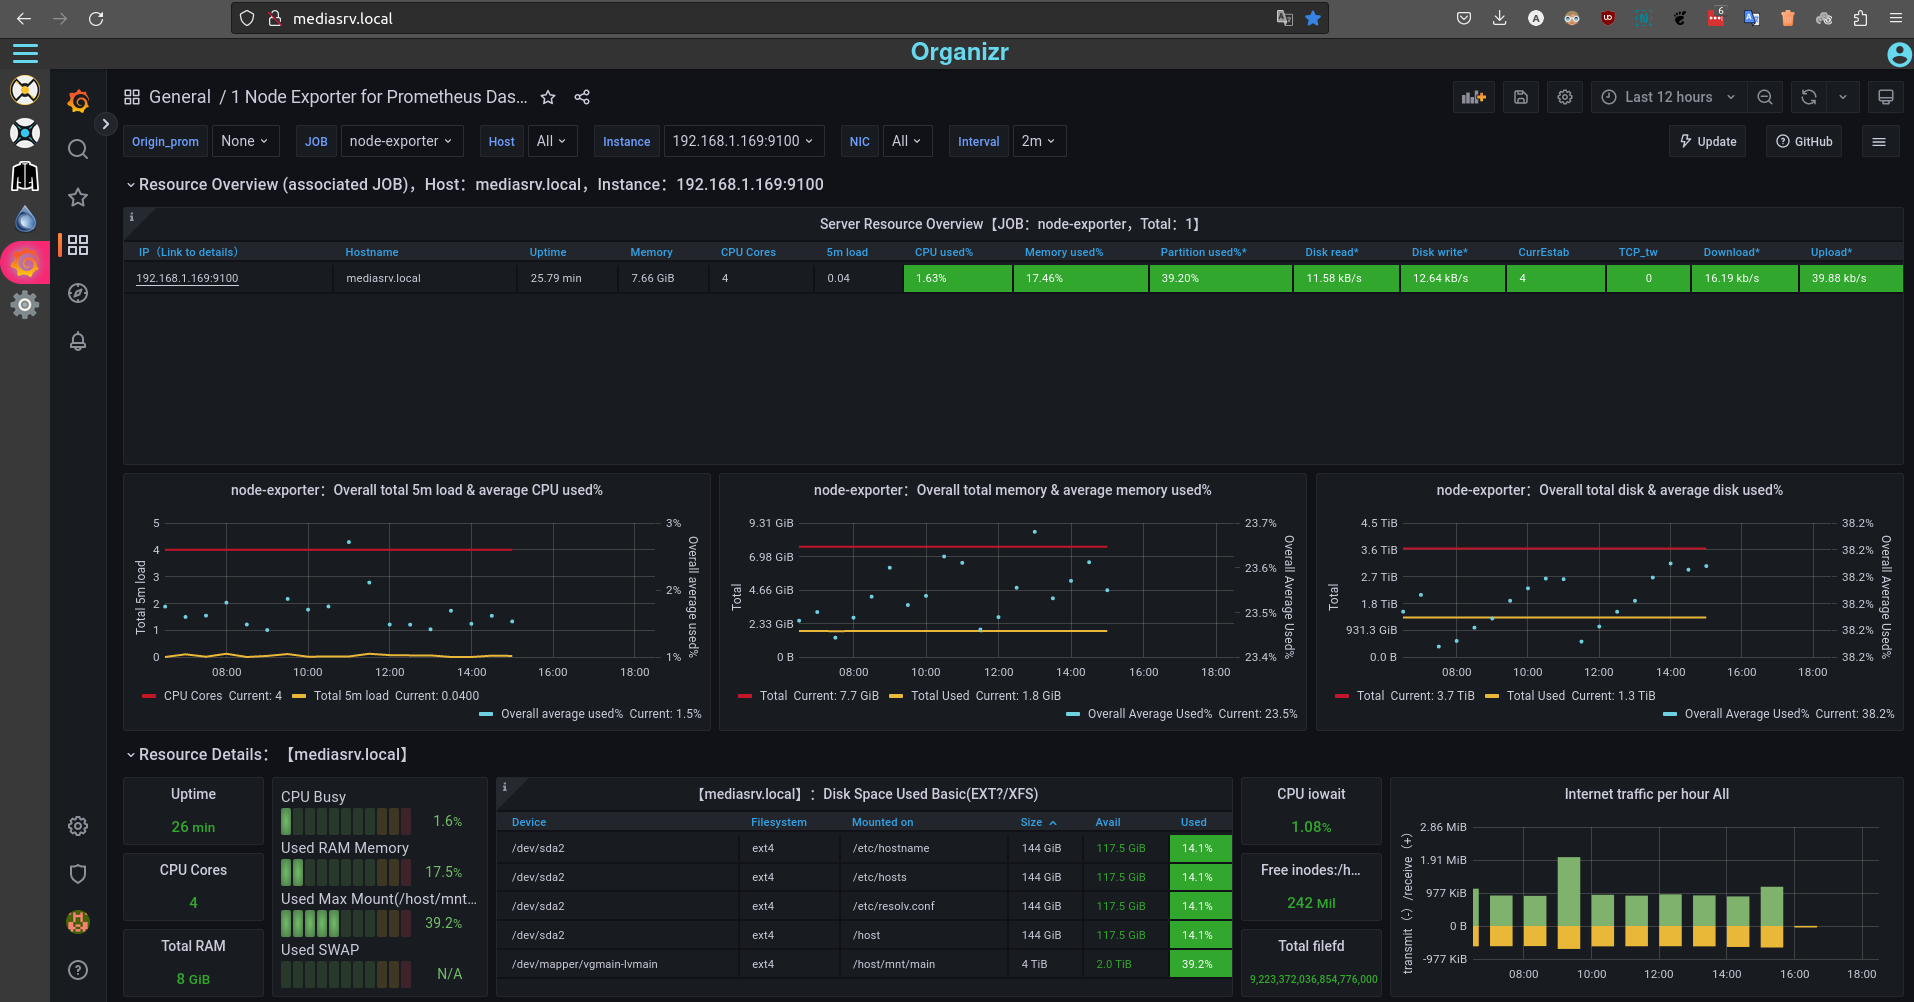
Setting up Monitoring#
Last but not least we can set up beautiful graphs and charts on server monitoring. We use Graphana with Prometheus to achieve this. Here's the docker-compose.yml for monitoring tools:
# System Monitoring =========================================================================

  prometheus:
      image: prom/prometheus
      container_name: prometheus
      environment:
        - PUID=1000
        - PGID=1000
        - TZ=Europe/London
        - UMASK_SET=022
      volumes:
        - /mnt/main/config/Prometheus/prometheus.yml:/etc/prometheus/prometheus.yml
      ports:
        - 9292:9090
      restart: unless-stopped

  node-exporter:
      image: quay.io/prometheus/node-exporter:latest
      container_name: node-exporter
      network_mode: host
      environment:
        - PUID=1000
        - PGID=1000
        - TZ=Europe/London
        - UMASK_SET=022
      volumes:
        - /:/host:ro,rslave
      restart: unless-stopped


  grafana:
    image: grafana/grafana
    container_name: grafana
    environment:
      - PUID=1000
      - PGID=1000
      - TZ=Europe/London
      - UMASK_SET=022
      - GF_SECURITY_ALLOW_EMBEDDING=true
    ports:
      - 3000:3000
    restart: unless-stopped


networks:
  default:
    external:
      name: mynet
Note that you need to place a file under /mnt/main/config/Prometheus/prometheus.yml with the following contents:
global:
  scrape_interval: 5s
  external_labels:
    monitor: 'node'
scrape_configs:
  - job_name: 'prometheus'
    static_configs:
      - targets: ['192.168.1.169:9292'] ## IP Address of the localhost
  - job_name: 'node-exporter'
    static_configs:
      - targets: ['192.168.1.169:9100'] ## IP Address of the localhost
Remember to change the IP address above to match the one of your server! To configure the GUI watch one of the many Youtube videos on "server monitor with graphana and prometheus". Here's a snapshot of my Graphana view: