NodeMCU: The chip powering countless DIY IoT projects, NodeMCU brings the cloud right onto your board
Introduction to NodeMCU#
In the vast and ever-evolving cosmos of the Internet of Things (IoT), there lies a star that has been steadily rising to prominence - the NodeMCU. It's not just a piece of technology; it's a gateway to endless possibilities, a canvas for your creativity. Imagine a world where your ideas aren't just ideas, but tangible, interactive, and intelligent creations. This is the world NodeMCU invites you to explore.
At its core, NodeMCU represents a fusion of dreams and reality for IoT aficionados and DIY hobbyists. It's a testament to how far we've come in the world of embedded systems and how accessible sophisticated technology has become. With its versatile nature and user-friendly approach, NodeMCU is more than just a microcontroller; it's a beacon of innovation in the IoT space.
From its humble beginnings to its current status as a cornerstone of IoT projects, NodeMCU has journeyed through an evolution that mirrors the growth of IoT itself. In this comprehensive guide, we'll embark on an exciting exploration of NodeMCU - uncovering its key features, capabilities, and why it has become an indispensable tool in the hands of creators and innovators.
Whether you are taking your first steps into the world of embedded electronics or you're a seasoned veteran looking to expand your toolkit, NodeMCU offers a world where limitations are set only by your imagination. Let's dive into this journey together, discovering how NodeMCU is not just changing the landscape of IoT, but also empowering us to build, innovate, and dream bigger.
Technical Deep-Dive: Understanding NodeMCU#
Welcome to the heart of our guide, where we unravel the intricacies of NodeMCU. This section is more than just technical jargon; it's a journey into the core of what makes NodeMCU a standout player in the IoT world. As we dissect its components and functionalities, you'll gain a deeper understanding and appreciation for this incredible tool. Let’s dive into the details and uncover the magic behind NodeMCU.
NodeMCU Firmware: Lua and C Programming Language Insights#
NodeMCU is not your ordinary firmware; it's a revolutionary approach to programming microcontrollers. At its core, NodeMCU offers a unique blend of flexibility and power, thanks to its dual compatibility with Lua and C programming languages. Lua, known for its simplicity and efficiency, is an interpreter language embedded within NodeMCU. This means you can write Lua scripts directly for the ESP8266, transforming complex ideas into simple, yet powerful code.
But what if you're more comfortable with C? That's where NodeMCU stands apart. You can use the Arduino IDE, a familiar and beloved tool among developers, to program your ESP8266 with NodeMCU. This dual-language support breaks down barriers, making NodeMCU accessible to a broader range of programmers, from beginners to experts. Whether you're scripting in Lua or coding in C, NodeMCU offers a seamless, user-friendly experience, opening up a world of possibilities in IoT development.
ESP-12E Module and Its Layout#
At the heart of NodeMCU is the ESP-12E module, a powerful and versatile piece of hardware. The ESP-12E is part of the ESP8266 family but stands out with its generous provision of 17 GPIO (General Purpose Input/Output) pins. This abundance of pins opens the door to a myriad of functionalities, from controlling LEDs and sensors to communicating with other devices. But it's not just about quantity; the quality and flexibility of these GPIO pins make the ESP-12E module incredibly efficient for a wide range of IoT applications.
The layout of the ESP-12E module is a testament to its user-friendly design. Featuring edge castellations, it's a breeze to solder onto a PCB, making it ideal for both beginners and seasoned makers. The module also includes an ADC (Analog to Digital Converter) pin and SPI (Serial Peripheral Interface) pins, further enhancing its versatility. Whether you're building a simple home automation system or a complex IoT network, the ESP-12E module, with its robust layout and extensive GPIO options, is perfectly equipped to bring your projects to life.
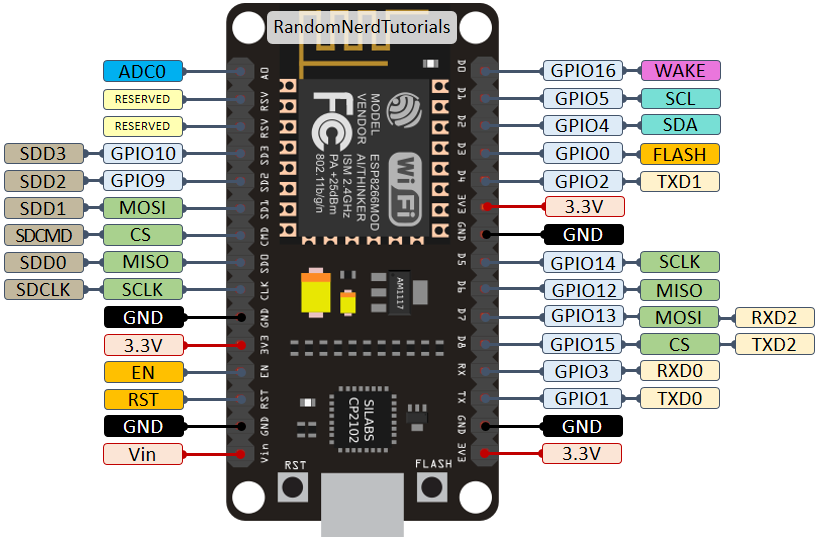
Pinout and GPIO Pins Explained#
Understanding the pinout of the NodeMCU is crucial for unleashing its full potential. Each pin on the NodeMCU serves a specific function, and knowing how to utilize them effectively can significantly enhance your IoT projects. The GPIO pins, for example, are the heroes of the NodeMCU universe. They allow you to interact with a wide array of sensors and actuators, making them the building blocks of any IoT system.
But the NodeMCU's functionality extends beyond just GPIO pins. It also includes specialized pins for ADC and SPI, allowing for more complex operations like reading analog sensors or communicating with other microcontrollers. This combination of GPIO, ADC, and SPI pins on the NodeMCU makes it a versatile and powerful tool for any IoT enthusiast. Whether you're toggling LEDs, reading sensor data, or sending signals to other devices, the NodeMCU's pinout offers the flexibility and power you need to bring your ideas to life.
This section of the guide aims to provide a detailed and educational insight into the technical aspects of NodeMCU. By understanding these fundamentals, you'll be better equipped to harness the full potential of NodeMCU in your IoT projects.
Setting Up NodeMCU#
Embarking on the NodeMCU journey begins with setting it up correctly. This section is crucial for anyone looking to harness the full potential of NodeMCU in their projects. Whether you're a beginner or have some experience, these steps will guide you through the initial setup process, ensuring a smooth and successful start to your NodeMCU adventures.
Initial Steps: Installing Arduino IDE and Configuring for NodeMCU#
Getting started with NodeMCU involves a familiar friend for many developers – the Arduino Integrated Development Environment (IDE). The first step is to ensure you have Arduino IDE installed on your computer. This powerful, user-friendly platform is the gateway to programming your NodeMCU.
Once the Arduino IDE is up and running, it’s time to make it NodeMCU-ready. This involves a simple but crucial step: adding the ESP8266 board manager to the Arduino IDE. By navigating to File -> Preferences, and inserting the URL https://arduino.esp8266.com/stable/package_esp8266com_index.json into the “Additional Boards Manager URLs” field, you enable the IDE to support NodeMCU programming. This small step is a giant leap in unlocking the programming capabilities of NodeMCU with the comfort and familiarity of Arduino IDE.
Connecting and Programming NodeMCU with Arduino IDE#
With the Arduino IDE configured, the next step is to connect your NodeMCU to your computer using a micro-USB cable. This simple connection is where the magic begins, turning your computer into a command center for NodeMCU. Once connected, you'll select the NodeMCU board under Tools -> Board -> ESP8266 Boards, ensuring that the IDE knows exactly what hardware it's communicating with.
Programming the NodeMCU via Arduino IDE is an exhilarating experience. You can write or upload sketches just like you would for an Arduino board. The process involves selecting the right port under Tools -> Port, where your NodeMCU is connected. After writing your code or loading an existing sketch, hitting the upload button brings your code to life on the NodeMCU. It’s a seamless transition from code on screen to action in the real world, bridging the gap between imagination and reality.
Common Issues and Troubleshooting#
As with any technology, you might encounter some hiccups along the way. Common issues with setting up NodeMCU often include problems with port detection, driver compatibility, or board selection in Arduino IDE. Troubleshooting these problems typically involves ensuring that the correct drivers for the USB to UART bridge (like CP2102) are installed, and that the correct board and port are selected in the Arduino IDE.
Another common issue is the failure of the computer to recognize the NodeMCU board. This can usually be resolved by trying a different USB cable or port, as some cables are charge-only and do not support data transfer. Additionally, ensuring that your NodeMCU board is not physically damaged and that the USB to UART bridge is functioning correctly can help solve connectivity issues. Remember, a little bit of troubleshooting can go a long way in ensuring a smooth experience with NodeMCU.
By following these detailed steps and being aware of common issues, you will be well on your way to successfully setting up your NodeMCU. This setup is your first step into a world where your creative IoT projects come to life.
Exploring NodeMCU Components#
As we delve deeper into the NodeMCU ecosystem, it becomes essential to understand the components that make up this versatile board. This section is dedicated to unraveling the mysteries of the NodeMCU's hardware, providing you with the knowledge needed to fully leverage its capabilities. From its onboard controller to its unique features, every component plays a vital role in the functionality and flexibility of NodeMCU.
Breakout Board Features: USB to UART Controller and On-board Regulators#
One of the standout features of the NodeMCU is its onboard USB to UART (Universal Asynchronous Receiver/Transmitter) controller. This component is a game-changer, simplifying the process of uploading code from your computer to the NodeMCU. In many models, the CP2102 IC from Silicon Labs serves as this controller, offering a stable and reliable bridge between your computer's USB port and the NodeMCU's serial interface. This integration means you don't need additional hardware to program your NodeMCU, making it more accessible and user-friendly, especially for beginners.
Alongside the USB to UART controller, the NodeMCU also includes on-board voltage regulators. These regulators are crucial because the ESP8266 chip, which is at the heart of NodeMCU, operates at 3.3V, whereas most computer USB ports supply 5V. The on-board regulator steps down this voltage to a safe level, ensuring that your NodeMCU operates in a stable and secure environment. This feature not only protects the board but also simplifies the power supply, eliminating the need for external voltage regulation.
Understanding LEDs and GPIO Pins#
The NodeMCU board is equipped with two on-board LEDs, which are invaluable for basic diagnostics and for use in your projects. The first LED, typically connected to the GPIO 2 pin, can be programmed to indicate various statuses or actions, such as signaling the completion of a task or the receipt of data. The second LED, usually connected to GPIO 16, offers additional options for feedback and interaction in your projects. These LEDs are active LOW, meaning they turn on when their corresponding GPIO pins are set to a LOW voltage level. This feature allows you to easily test and debug your NodeMCU applications, providing visual feedback directly from the board.
The General Purpose Input/Output (GPIO) pins are the bread and butter of the NodeMCU. These pins are what make the NodeMCU so versatile, allowing it to interact with a wide range of sensors, actuators, and other devices. With a generous number of GPIO pins available, you can connect multiple components simultaneously, enabling complex and multifaceted IoT projects. Each GPIO pin can be programmed for various functions, such as digital input, digital output, PWM (Pulse Width Modulation) output, and more. This flexibility opens up a world of possibilities, allowing your NodeMCU to truly become the heart of your IoT ecosystem.
By gaining a thorough understanding of these components, you're now equipped to make the most out of your NodeMCU board. Whether it's programming the LEDs for basic output or utilizing the GPIO pins for intricate projects, these insights form the foundation of your journey into the fascinating world of NodeMCU and IoT.
Programming NodeMCU#
Programming is where your NodeMCU projects come to life, transforming lines of code into real-world actions and reactions. This section is dedicated to guiding you through the programming aspects of NodeMCU, from writing your first script to exploring advanced programming techniques. Whether you are a beginner or an experienced developer, understanding how to effectively program the NodeMCU is key to unlocking its full potential.
Writing and Uploading Basic Scripts (e.g., Blinking LED Example)#
A great starting point for programming the NodeMCU is the classic 'Blinking LED' example. This simple project is not just about turning an LED on and off; it's a fundamental step in understanding how to control the NodeMCU's GPIO pins through programming. To begin, you'll write a script in the Arduino IDE that toggles one of the onboard LEDs. This script will use basic commands to set the GPIO pin as an output, and then to turn the LED on (set the pin LOW) and off (set the pin HIGH) in a loop.
Uploading this script to your NodeMCU is straightforward. With your NodeMCU connected to your computer via a micro-USB cable and the correct board and port selected in the Arduino IDE, simply click the 'Upload' button. The IDE compiles the script into bytecode, which is then uploaded to the NodeMCU. Once uploaded, the NodeMCU executes the script, and you should see the LED start to blink. This process not only demonstrates the basics of NodeMCU programming but also familiarizes you with the upload procedure and troubleshooting any issues that may arise, such as connection errors or syntax mistakes in your code.
Lua vs. Arduino IDE: Pros and Cons#
NodeMCU offers the flexibility to program in Lua directly or use the Arduino IDE. Each method has its advantages and considerations. Lua, being a lightweight scripting language, is ideal for simple, standalone NodeMCU projects. It allows for quick development and iteration, with scripts being easier to write and modify. However, Lua might have limitations when it comes to more complex applications, especially those requiring extensive libraries and support that are readily available in the Arduino environment.
On the other hand, programming the NodeMCU using the Arduino IDE opens up a familiar environment for those who have worked with Arduino boards. It provides access to a vast library of existing code and community support, making it easier to implement complex functionalities. While the Arduino IDE offers more robust capabilities, it can be slightly more cumbersome for quick, small-scale projects compared to the straightforwardness of Lua scripting. Ultimately, the choice between Lua and Arduino IDE programming depends on your project requirements and personal preferences.
Advanced Programming Tips and Tricks#
As you become more comfortable with basic NodeMCU programming, you can explore advanced techniques to enhance your projects. This includes mastering the use of interrupts for responsive designs, leveraging WiFi capabilities for IoT connectivity, and optimizing power consumption for battery-operated devices. Understanding how to efficiently manage memory and utilize deep sleep modes can significantly improve the performance and durability of your NodeMCU projects.
Additionally, integrating external sensors and modules expands the functionality of your NodeMCU board. Learning how to interface with different types of sensors (like temperature, humidity, motion sensors) and communication modules (like Bluetooth or Zigbee) opens up a world of possibilities for your IoT projects. Experimenting with these advanced concepts not only broadens the scope of your projects but also deepens your understanding and skills in the realm of embedded systems and IoT.
Through this comprehensive overview of programming NodeMCU, you are now equipped with the knowledge to start creating, experimenting, and innovating. Whether it's writing simple scripts or diving into complex IoT applications, the world of NodeMCU programming is rich with opportunities for exploration and creativity.
Real-World Applications and Projects#
Exploring the practical applications of NodeMCU is where the true excitement lies for IoT enthusiasts and hobbyists. This section aims to bridge the gap between theory and real-world application, showcasing how NodeMCU can be utilized in various projects. From simple home automation to complex IoT systems, NodeMCU’s versatility makes it an ideal choice for a wide range of applications.
Sample IoT Projects using NodeMCU#
Starting with home automation, a popular application for NodeMCU, you can create projects that control lights, thermostats, or even security systems through the internet. For instance, using NodeMCU, you can develop a system that lets you control your home lighting via a smartphone app. This involves programming the NodeMCU to connect to your Wi-Fi network and receive commands from your phone, which then triggers the connected lights through relay modules. Such a project not only introduces you to the basics of IoT but also provides practical, everyday utility.
Another exciting application is creating a weather station. By connecting various sensors to NodeMCU, such as temperature, humidity, and pressure sensors, you can collect real-time environmental data. This data can be sent to an IoT platform like ThingSpeak or your own server, allowing you to monitor and analyze weather patterns over time. This project not only enhances your understanding of sensor integration but also offers insights into data handling and cloud connectivity in IoT systems.
Community Contributions and Case Studies#
The NodeMCU community is vast and active, with members constantly sharing innovative projects and ideas. Engaging with this community can provide invaluable insights and inspiration for your own projects. For example, many community members have shared their experiences in building smart irrigation systems using NodeMCU, which automatically water plants based on soil moisture levels. These case studies often include detailed instructions, code snippets, and troubleshooting tips, making them a great resource for learning and experimentation.
Another area where community contributions shine is in the development of custom IoT applications, such as pet feeders, smart mirrors, or personalized notification systems. These projects often combine various technologies like web development, database management, and mobile app development with NodeMCU, showcasing its ability to integrate seamlessly into broader technology ecosystems. By exploring these case studies, you not only learn about NodeMCU but also about how it interacts with other technologies to create comprehensive solutions.
This exploration of real-world applications and community projects highlights the practicality and adaptability of NodeMCU in a variety of settings. Whether you are looking to enhance your home, understand the environment, or connect with a global community of innovators, NodeMCU offers a platform to turn your ideas into reality. Through these applications, you'll see just how your skills in programming and electronics can have a tangible impact in the world.
NodeMCU: Beyond the Basics#
After mastering the fundamentals of NodeMCU, it's time to push the boundaries and explore its advanced capabilities. This section delves into the more sophisticated aspects of NodeMCU, highlighting how it can be integrated with other technologies and platforms. By expanding your NodeMCU knowledge, you can take your projects from simple applications to complex, interconnected systems that represent the cutting edge of IoT development.
Advanced Modules and Add-ons#
One of the ways to enhance the capabilities of your NodeMCU is by integrating it with various modules and add-ons. For instance, adding a GPS module can transform your NodeMCU project into a location-aware device, perfect for tracking applications or smart vehicles. When integrating a GPS module, you'll delve into serial communication and parsing GPS data, expanding your technical skills and understanding of geolocation technologies.
Another exciting add-on is the incorporation of wireless communication modules, such as Zigbee or Bluetooth Low Energy (BLE). These modules enable your NodeMCU to communicate with other devices wirelessly, opening up possibilities for creating mesh networks, smart home systems, or even IoT hubs. Learning to integrate these modules involves understanding wireless communication protocols and network topology, further broadening your IoT expertise.
Integrating NodeMCU with Other IoT Platforms#
NodeMCU's true potential is unleashed when it's integrated with other IoT platforms. For example, connecting NodeMCU with platforms like AWS IoT or Google Cloud IoT enables you to store, process, and analyze the data collected by your NodeMCU device. This integration requires an understanding of cloud services, data security, and network management, providing an excellent opportunity to delve into the world of cloud computing and big data.
Another integration avenue is using NodeMCU with home automation platforms like Home Assistant or OpenHAB. This integration allows you to create sophisticated home automation systems that are customizable and can interact with a wide range of devices. It involves learning about APIs, MQTT protocol, and smart home standards, offering a comprehensive look into the world of smart home technology.
Future Trends and Developments in NodeMCU Technology#
As IoT continues to evolve, so does NodeMCU. Staying abreast of the latest trends and developments in NodeMCU technology is crucial for any IoT enthusiast. This includes keeping an eye on advancements in firmware, new modules, and emerging IoT protocols that could enhance the capabilities of NodeMCU.
Additionally, the growing focus on AI and machine learning in IoT presents exciting possibilities for NodeMCU projects. Integrating AI algorithms with NodeMCU, for applications like predictive maintenance or environmental monitoring, represents the next frontier in IoT development. This requires a foundational understanding of machine learning concepts and the ability to implement these algorithms in a resource-constrained environment like NodeMCU.
In this section, we've explored the advanced aspects of NodeMCU, from integrating with other technologies to staying updated with future trends. These insights are intended to inspire you to take your NodeMCU projects to new heights, leveraging its full potential to create innovative and impactful IoT solutions.
As we conclude our comprehensive journey through the world of NodeMCU, let's reflect on the rich tapestry of opportunities this versatile tool offers to IoT enthusiasts and hobbyists. From the initial exploration of its technical makeup and firmware options in Section II, where we delved into the intricacies of Lua and C programming, to the practical setup guidance in Section III, ensuring a smooth start to your NodeMCU experience. We journeyed through the crucial hardware components in Section IV, highlighting the significance of onboard controllers and GPIO pins for your projects.
Our adventure then took us into the realms of programming in Section V, where we learned to breathe life into our NodeMCU boards through scripts and advanced programming techniques. Section VI expanded our horizons further, showcasing real-world applications and community-driven projects, illustrating how NodeMCU acts as a cornerstone in various innovative IoT systems. Finally, in Section VII, we ventured beyond the basics to explore advanced modules, integrations with IoT platforms, and emerging trends, positioning NodeMCU at the forefront of IoT development.
Now, armed with this knowledge, the path lies open for you to embark on your own NodeMCU projects. Whether it's automating your home, building a personal weather station, or integrating advanced IoT technologies, the potential is limitless. Remember, the NodeMCU is not just a tool; it's a canvas for your creativity and a bridge to realizing your IoT dreams.
So, take that first step, experiment with a simple blinking LED project, or dive into more complex integrations. Each project, no matter the size, is a step forward in your IoT journey. And as you progress, stay connected with the vibrant NodeMCU community, drawing inspiration and sharing your experiences. Your journey with NodeMCU is just beginning, and the future is bright with possibilities. Embrace it with enthusiasm, and let your imagination lead the way in this exciting world of IoT and embedded systems.