First project in RIOT-OS: OLED
Today, we're diving into a nifty project that's as exciting as it is educational. We're going to use the STM32F103C8 "Blue Pill" microcontroller and Riot-OS to drive an SSD1306 I2C OLED module – and trust me, it's going to be a blast!
First off, for those new to the playground, let's give a quick intro to our main characters. The STM32F103C8, affectionately known as the "Blue Pill," is a seriously cost-effective microcontroller that packs a punch with an ARM Cortex-M3 processor. Then there's Riot-OS, an open-source operating system that's optimized for IoT devices. It's like the life of the party for microcontrollers, giving them the software needed to interact with the world. And the SSD1306 is a tiny OLED display that’s so easy to get along with; it communicates over I2C, which means we can have a nice little chat with just a couple of wires.
So, let's get to the meat and potatoes.
Materials Needed:
- STM32F103C8 "Blue Pill" microcontroller
- SSD1306 I2C OLED display
- Connecting wires
- USB to Serial converter for programming
Step 1: Setting Up the Environment Before we start, ensure you have a programming environment set up for the STM32F103C8. You'll need the ARM GCC compiler and OpenOCD for flashing. For Riot-OS, clone the repository from GitHub and get the build environment ready.
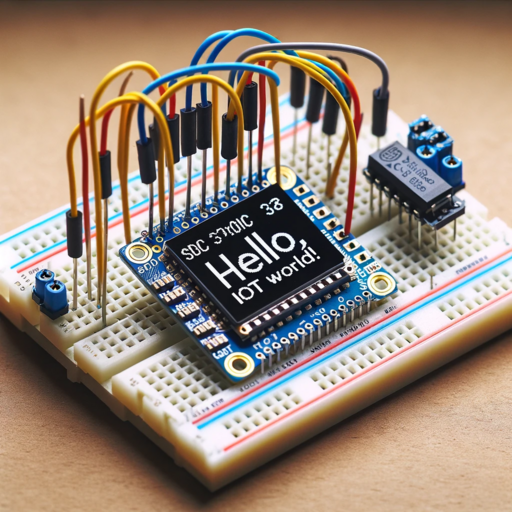
Step 2: Wiring Up Connect your SSD1306 display to the Blue Pill. The display needs four connections:
- VCC to 3.3V
- GND to GND
- SCL to B6 (or whichever I2C clock pin you prefer)
- SDA to B7 (or your chosen I2C data pin)
Step 3: Bootstrapping Riot-OS Navigate to the Riot-OS base directory and create a new project for our Blue Pill. You can find a board configuration for the Blue Pill in Riot's boards directory if you don't feel like starting from scratch.
Step 4: Writing The Code Here's a simple skeleton to start with in your main.c:
int
Step 5: Building and Flashing To compile and flash your code to the Blue Pill, use the following commands from your project's directory:
make BOARD=bluepill flash
Assuming all goes well, you should see your "Hello, IoT World!" message on the display.
Step 6: Experimenting Now that you've got the basics down, why not play around with the display? Riot-OS has a rich set of libraries for graphics, so you can draw shapes, display sensor data, or even create a mini game on your OLED.
Step 7: Debugging If you run into any issues, remember: debugging is half the fun in embedded systems. Check your connections, ensure the I2C addresses match, and use the make term command to peek into the logs.
Wrapping Up You've just made a microcontroller communicate with an OLED display, and that's pretty darn cool. The Blue Pill and Riot-OS are like peanut butter and jelly – they just work beautifully together.
Remember, the key to mastery is experimentation. So, tweak the contrast, flip the display, scroll text, and see what your Blue Pill can do. With the SSD1306, your Blue Pill isn’t just crunching numbers; it’s showing off its results with style.
And there you have it, folks – a simple, yet thrilling journey through embedded development with a dash of IoT. Keep tinkering, keep learning, and most importantly, keep having fun. Until next time, may your connections be stable and your code bug-free!