Port forwarding on site-to-site VPN using wireguard, AKA Howto bittorrent behind CGNAT for free
Disclaimer: Note that we will be using bitorrent to share Linux ISOs here. The free providers I mention (Oracle being the most generous) will get you into trouble otherwise. The free providers are available as per demand. Alternatively you could head over to lowendbox.com to grab the ultimate $1 pm VPS deals; atleast that's what I did to trial out the system without colluding my main VPS with IPTable rules :)
Another disclaimer: messing with IPTables on your VPS could leave it inaccessible via SSH and lock you out. Fortunately they don't persist reboots :)
So I recently got a 5g home wireless plan. The speeds are great; but my provider only provides a CGNAT link. This means local port forwarding on the router is out of the question. It wouldn't work.
Sure you could use ip6. While it's estimated to be used by 40% of users, when it comes to bittorrent it's hardly supported.
There are however docker images exactly for this purpose which run a VPN client in conjunction with qBittorrent. But as I've seen all of them only support (a select) commercial VPN providers. They don't function in a selfhosted wireguard scenario.
Which brings me to this blog article. Although it's a manual setup, they cutoff the instructions with only the client side setup and again assume a VPN provider.
But that's no good for us! We selfhost. This will be a full guide on site-to-site tunneling with port forwarding. Sure each setup will be varied; but I believe I have a very vanilla setup with a public facing VPS server and both the server and the client running wireguard in docker.
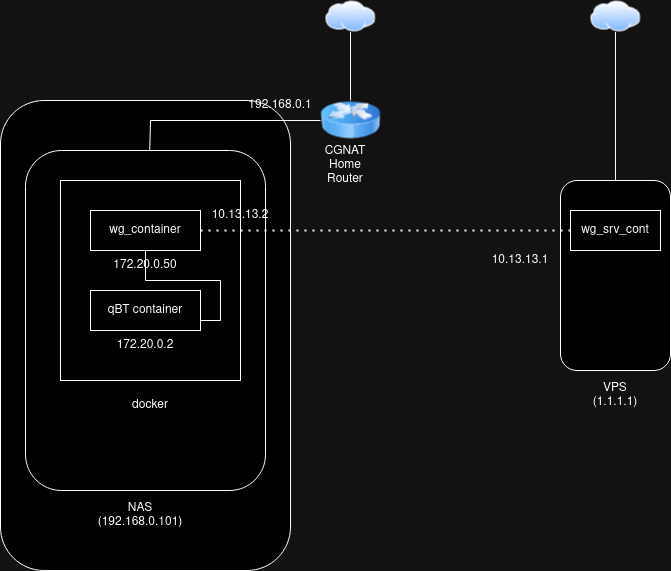
Here's a visual view of what we'll be setting up:
The server#
In our case we'll be running the wireguard server via docker as well. This may take up extra resources than running in bare metal, but I'm used to docker so much. In the example we will be forwarding port 5000.
Here's the docker-compose.yml file:
services:
  wireguard:
    image: lscr.io/linuxserver/wireguard:latest
    container_name: wireguard
    cap_add:
      - NET_ADMIN
      - SYS_MODULE #optional
    environment:
      - PUID=1000
      - PGID=1000
      - TZ=Etc/UTC
      - SERVERURL=<server-ip> #optional
      - SERVERPORT=51820 #optional
      - PEERS=1 #optional
      - PEERDNS=auto #optional
      - INTERNAL_SUBNET=10.13.13.0 #optional
      - ALLOWEDIPS=0.0.0.0/0 #optional
      - PERSISTENTKEEPALIVE_PEERS= #optional
      - LOG_CONFS=true #optional
    volumes:
      - /home/<user>/.config/appdata/wg:/config #<-- note this location
      - /lib/modules:/lib/modules #optional
    ports:
      - 51820:51820/udp
      - 5000:5000
      - 5000:5000/udp
    sysctls:
      - net.ipv4.conf.all.src_valid_mark=1
    restart: unless-stopped
You need to put in your <server-ip> accordingly. Bring it up, and it'll autogenerate the wg.conf files. The server conf file will be ~/.config/appdata/wg/wg_confs/wg0.conf. We'll need to put in some IPTables into it.
[Interface]
Address = 10.13.13.1
ListenPort = 51820
PrivateKey =
PostUp = iptables -A FORWARD -i %i -j ACCEPT; iptables -A FORWARD -o %i -j ACCEPT; iptables -t nat -A POSTROUTING -o eth+ -j MASQUERADE
PostDown = iptables -D FORWARD -i %i -j ACCEPT; iptables -D FORWARD -o %i -j ACCEPT; iptables -t nat -D POSTROUTING -o eth+ -j MASQUERADE


PreUp = iptables -t nat -A PREROUTING -p tcp --dport 5000 -j DNAT --to-destination 10.13.13.2:5000; iptables -t nat -A PREROUTING -p udp --dport 5000 -j DNAT --to-destination 10.13.13.2:5000
PostDown = iptables -t nat -D PREROUTING -p tcp --dport 5000 -j DNAT --to-destination 10.13.13.2:5000; iptables -t nat -D PREROUTING -p udp --dport 5000 -j DNAT --to-destination 10.13.13.2:5000
PreUp = iptables -t nat -A POSTROUTING -o wg0 -j MASQUERADE
PostDown = iptables -t nat -D POSTROUTING -o wg0 -j MASQUERADE

PreUp = iptables -A FORWARD -i eth0 -o wg0 -p tcp --dport 5000 -j ACCEPT; iptables -A FORWARD -i eth0 -o wg0 -p udp --dport 5000 -j ACCEPT
PreUp = iptables -A FORWARD -i wg0 -o eth0 -p tcp --sport 5000 -j ACCEPT; iptables -A FORWARD -i wg0 -o eth0 -p udp --sport 5000 -j ACCEPT

PreUp = iptables -t nat -A POSTROUTING -o wg0 -p tcp --dport 5000 -j MASQUERADE; iptables -t nat -A POSTROUTING -o wg0 -p udp --dport 5000 -j MASQUERADE

PostDown = iptables -D FORWARD -i eth0 -o wg0 -p tcp --dport 5000 -j ACCEPT; iptables -D FORWARD -i eth0 -o wg0 -p udp --dport 5000 -j ACCEPT
PostDown = iptables -D FORWARD -i wg0 -o eth0 -p tcp --sport 5000 -j ACCEPT; iptables -D FORWARD -i wg0 -o eth0 -p udp --sport 5000 -j ACCEPT

PostDown = iptables -t nat -D POSTROUTING -o wg0 -p tcp --dport 5000 -j MASQUERADE; iptables -t nat -D POSTROUTING -o wg0 -p udp --dport 5000 -j MASQUERADE

[Peer]
# peer1
PublicKey =
PresharedKey =
AllowedIPs = 10.13.13.2/32
The first two routes, PostUp and PostDown will be added automatically, don't change it.
Once that is added, bring up the service one more time. Now run docker compose logs and check there's no errors.
Client#
Much of the client side config is based off of the above referenced blog post. But in my experience it needed additional IPTables route lines I will show below.
Here's the docker compose:
networks:
  default:
    name: wgnet
    ipam:
      config:
      - subnet: 172.20.0.0/24

services:

  wireguard:
    image: lscr.io/linuxserver/wireguard:latest
    container_name: wireguard
    cap_add:
      - NET_ADMIN
      - SYS_MODULE
    environment:
      - PUID=1000
      - PGID=1000
      - TZ=Australia/Sydney
    volumes:
      - /mnt/main/config/wg:/config      #<--- path for your config
      - /lib/modules:/lib/modules
    networks:
      default:
        ipv4_address: 172.20.0.50
    sysctls:
      - net.ipv4.conf.all.src_valid_mark=1
      #- net.ipv6.conf.all.disable_ipv6=0
      #- net.ipv4.ip_forward=1
    restart: unless-stopped

  qbittorrent:
    image: lscr.io/linuxserver/qbittorrent:latest
    container_name: qbittorrent
    #networks:
      #- wgnet
    networks:
      default:
        ipv4_address: 172.20.0.2
    environment:
      - PUID=1000
      - PGID=1000
      - TZ=Australia/Sydney
      - WEBUI_PORT=8080
      - TORRENTING_PORT=5000
    volumes:
      - /mnt/main/config/qbtorrent:/config
      - /mnt/main/media/torrents:/data/torrents:rw
    ports:
      - 8080:8080
    restart: unless-stopped
Now copy ~/.config/appdata/wg/peer1/wg0.conf to the client machine. Make the file as <your_path>/wg_confs/wg0.conf. Now add these IPTables.
[Interface]
Address = 10.13.13.2
PrivateKey =
ListenPort = 51820
DNS = 10.13.13.1

PostUp = iptables -t nat -A POSTROUTING -o wg+ -j MASQUERADE; iptables -t nat -A PREROUTING -p tcp --dport 5000 -j DNAT --to-destination 172.20.0.2:5000; iptables -t nat -A PREROUTING -p udp --dport 5000 -j DNAT --to-destination 172.20.0.2:5000
PreDown = iptables -t nat -D POSTROUTING -o wg+ -j MASQUERADE; iptables -t nat -D PREROUTING -p tcp --dport 5000 -j DNAT --to-destination 172.20.0.2:5000; iptables -t nat -D PREROUTING -p udp --dport 5000 -j DNAT --to-destination 172.20.0.2:5000

PostUp = iptables -A FORWARD -i wg0 -p tcp --dport 5000 -j ACCEPT; iptables -A FORWARD -i wg0 -p udp --dport 5000 -j ACCEPT
PreDown = iptables -D FORWARD -i wg0 -p tcp --dport 5000 -j ACCEPT; iptables -D FORWARD -i wg0 -p udp --dport 5000 -j ACCEPT

[Peer]
PublicKey =
PresharedKey =
Endpoint = <server-ip>:51820
AllowedIPs = 0.0.0.0/0
Now bring up the services on the client. Then run these commands:
docker exec --privileged qbittorrent ip route del default
docker exec --privileged qbittorrent ip route add default via 172.20.0.50

docker exec --privileged qbittorrent ip route add 192.168.0.0/24 via 172.20.0.1
The first two will re-route qBT container traffic to wireguard container, and then through the tunnel. The third command will make an exception for the qBT webUI to be accessed locally. Make sure to use the appropriate subnet accordingly. Eg. you may need to change to 192.168.1.0/24 which is another popular Home LAN subnet.
Remember these docker exec commands need to be run each time you restart these containers. Alternatively you may script them for automation.